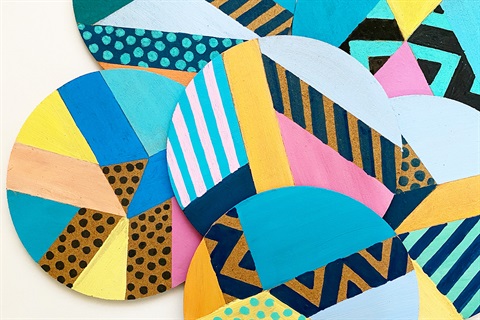
Colourful Coasters
You will need:
- Wooden coasters
- Masking tape/Washi tape/Painter’s tape
- Acrylic paints in a range of basic colours
- Paint pens or markers
- Paint brushes
- Paint palette (or a plastic lid/plate)
- Water jar, paper towel/cloth for washing and wiping brushes
- Scrap paper for testing paint colours and patterns, and laying coasters on while painting
- Sealer/spray varnish if you want the coasters to be functional and waterproof
1. Prepare your coasters
Lay coasters flat on some scrap paper with some space between them. Take a roll of masking tape and cut numerous strips of tape. You can vary the widths and lengths of the masking tape.
Place the tape across the top flat side of each coaster in opposing directions and at different angles. Try to create a variety of shapes and patterns, and ensure the tape reaches the outside edge of the coasters. Press the tape down onto the coaster so it is completely flat. This will help make the painted shapes have smooth straight edges when you lift the tape off. If there are any small bubbles along the edge of the tape, paint can get underneath.
2. Choose your colours
Choose a colour palette/range of colours that you like and think will complement each other. There is no limit as to how many colours you can use, however mixing a range of 3-5 colours is a good start. Pour a small amount of each coloured paint that you want to use onto the paint palette. Start with a small amount about the size of a 5 cent piece - you can always add more if needed.
Pour some white paint onto the palette in a few areas as well in 5 cent piece amounts. This can be used to mix pastel colours.
3. Paint sections
Choose sections of the exposed wood on your coasters to paint these colours onto. Use a flat bristled paintbrush if you can, and use smooth even strokes, trying to smooth over any brush marks. You can go over the edge of the tape, and also paint over the edge of the coaster.
4. Reveal your shapes!
Once the paint is completely dry, slowly peel the masking tape off the coaster to reveal the wood.
5. Tidy up and add more colour
The sections of exposed wood can be left exposed or painted/coloured in with paint or paint pens. Any rough edges where the paint may have leaked under the tape can also be touched up to create nice smooth lines. The underside of the coaster can also be painted or left as it is.
6. Add details
Use the paint pens or markers to fill in some of the shapes with different patterns such as spots, polkadots, stripes, wavy lines, zig zags - it’s up to you!
7. Seal with a coat of varnish and enjoy!
When all the colour and patterns have been added, and the coasters are completely dry, a varnish or sealer can be applied to seal the paint to make them waterproof and fully functional. Enjoy your new one-of-a-kind decor!
Don't forget to share your creations with us through Social Media by using the hashtag #ghcreateathome