Colourful Collages
You will need:
- White A4 cartridge paper, 2-3 sheets
- Watercolour/mixed media paper (not essential but great for textures and if using water paints or inks)
- Black A4 paper, 1-2 sheets
- Blank greeting cards (if you want to make these) - white or Kraft cards, square or rectangular
- Acrylic, watercolour and/or gouache paint - you can use all three or just one type of paint
- Paintbrushes - small to medium size
- Chopsticks, old toothbrushes, foam sponges - these are great with ink for creating different textures and lines
- Drawing materials in a variety of colours - paint pens, sharpies, textas, oil pastels, ink
- Glue stick and scissors
Step 1.
Set up your painting and drawing materials, and spend some time making lots of different marks, patterns and textures on the cartridge paper and textured paper (if you have it).
Try painting lines, dashes, dots, zigzags, and many other patterns in various colours and different sizes. Also paint/draw some solid areas of colour, allowing brush marks to show. Try to create between 3-5 different marks/colours on each page. You may not use all these pages, but it gives you lots of material to work with.
NOTE: if you have used paint, let your pages dry before moving on to step 2.
Step 2.
Start cutting out shapes from your painted/drawn paper. Cut out a variety of shapes from each particular section of the painted/drawn patterns. This way you will have a wider mix of colours and patterns in your collage.
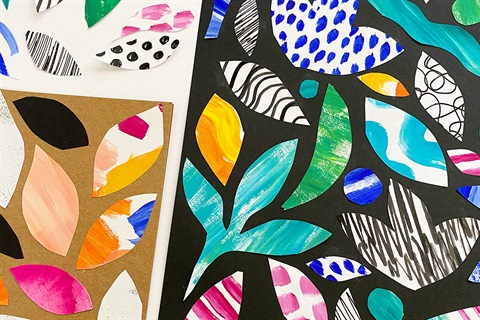
The shapes don’t have to be perfect - they can be rounded, sharp edged, or intricately cut out. Cut out multiple pieces of each particular shape. Your shapes may be inspired by florals, other botanicals, the ocean, food, geometric shapes, or they may be completely abstract (non-representational).
Gabriella’s shapes: “I decided to cut some floral-inspired shapes for this example, including petal and leaf shapes which I use a lot in my work. I cut my shapes approximately 2-10cm in size, which will allow you to fit quite a lot on the page, however the size of your shapes is completely up to you. ”
Step 3.
When you have a variety of shapes and sizes cut from your paper, start moving the pieces around on the black paper which will be your background (you can also use white or coloured paper instead). You might leave lots of space around each shape, you can overlap them, or fit them closely together. Think about how you might be able to create a pattern by repeating the placement of particular shapes, and how you can create balance in the composition. Cut out more shapes from the paper if you need to fill in more space.
Gabriella’s Collage Design: “In this example I have moved my shapes around in lots of different directions to create a sense of movement, and because of this the collage can be turned and viewed any way - there isn’t a top or bottom.”
Step 4.
When you are happy with your composition, start gluing all the pieces onto the black background, ensuring the edge of paper doesn’t lift up anywhere.
Step 5.
Admire your finished artwork! Put your collage in a frame to display. Also, don’t throw away all the scraps, the paper can be reused and re-cut to create more collages.
MORE COLLAGE IDEAS: Use the same technique on a smaller scale to collage greeting cards, and experiment with different subject matter. You might like to try a landscape-based collage by building up layers of horizontal strips of paper, or maybe a portrait!
Don't forget to share your creations with us through Social Media by using the hashtag #ghcreateathome