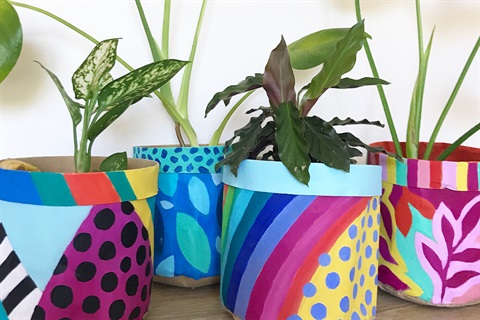
Pot Planter
You will need:
- Kraft planter pot
- Acrylic paint in a range of colours (see Colour Mixing tips here)
- Paintbrushes - small to medium range with flat and round brush heads plus one larger flat brush for painting the undercoat
- Water jar
- Paper towel/cloth for washing and wiping brushes
- Blank paper (1-2 sheets plus scrap paper)
- Scissors
- Lead pencil
- Paint pens/black permanent marker
- Blu Tack
Step 1. Choose Your Colour
Think of a colour range/palette for your pot. Will you be painting with a rainbow of bright colours? Or will you use predominantly warm or cool colours? Or maybe just 2-3 contrasting colours with some of their tints? (see Colour Mixing tips here).
Add these colours plus white to your paint palette. A 10 cent size amount of each colour is a good start, you can always add more, and then a larger amount of white (20 cent piece size). Mix a small amount of colour into the white, gradually adding more until you achieve the right tint.
Step 2. Base Coat
The first step will be painting the base coat of your pot. Light colours work best for this as a lighter background can be painted over more easily with other colours. You can however skip this step if you would like to keep the original colour as your base.
You can paint the base coat in one colour or break the surface into 2 or 3 areas. You may also like to paint the rim in a different colour for contrast.
Step 3.
Use the larger flat brush to paint a smooth even coat over the surface of the pot. Paint the whole surface (excluding the underneath of the pot), and also over the top of the rim and about 5cm down the inside surface.
PAINTING TIP: Dip your brush into the water and mix with the paint so when applied it goes on smoothly without clumpy brushstrokes. If it starts to feel too thick or isn’t flowing evenly, add a little more water, however the paint shouldn’t be runny and dripping or transparent when applied.
Step 4.
Repeat step 3 for the other colours of your base coat (if you’re painting with more than one colour), and then when it is almost dry, paint a second coat to ensure none of the Kraft colour is coming through.
Step 5. Create a design/ pattern
While the base coat is drying, use the blank cartridge paper and scissors to cut out shapes to create a pattern/design to paint on your pot.
Gabriella’s cutting tips: “Cut a variety of shapes out of the paper. You might cut out floral or botanic-inspired shapes, or focus on geometric or abstract shapes, however don’t make them too intricate. Cut straight into the paper and create the shapes instinctively, without too much planning. They may be different sizes, but no larger than the height of your pot. I would suggest roughly 5-8cm in approximate height/diameter.”
Step 6.
When you have a collection of about 8-10 shapes, lay them out in a horizontal composition, as though they will be curved around your pot. Move the shapes around like a jigsaw puzzle - you might like to have the shapes closely sitting next to each other, or overlapping, or with more space around them.
Step 7.
When the paint on your pot is completely dry, you can transfer your shape pattern onto the pot by using blu tac to lightly stick each piece of paper onto the pot in order, and then tracing it in pencil or a light coloured paint pen. Or you can simply copy the design straight onto the pot.
Step 8.
When your shape design is drawn onto the pot, start painting in the shapes in your chosen colour palette. You can use brighter or darker colours over the top of the base coat. Paint your pattern using smooth brushstrokes (add a little water if the paint seems too thick) and use different sized brushes for different sized areas. You can also outline the shapes in contrasting colours.
Gabriella’s Colours: “I have used some of the pure colours that I used to make my base coat, and then mixed some with white or other colours. Black and white can also be really effective when used amongst a pastel colours palette.”
Step 9.
Add a contrasting pattern to the rim of your pot, such as vertical stripes.
Step 10.
When the painted shapes are completely dry, use paint pens, sharpies, or paint with a fine paint brush to add patterns to different areas of your pot. You might like to add patterns to the shapes only and keep the background plain, or vice versa.
CREATIVE TIP: Use a blank piece of paper to sketch out some pattern ideas before transferring them to your pot. Try drawing spots, stripes waves, swirls, polkadots, zig zags, triangles, dashes, and vary the sizes of them.
Step 11:
Enjoy your pot! Your pot is now ready to use! When placing a plant in the Kraft pot, keep it in a self-watering pot or a plastic pot with a dish for collecting the water (you don’t want water seeping through the base of the Kraft pot). These Kraft pots are also best kept indoors.
Gabriella’s tip for pots outdoors: “If you have a terracotta pot and want to use it outside, I would recommend applying a sealer or varnish to protect the paint, but for just indoor use the acrylic paint will last as it is.”
Don't forget to share your creations with us through Social Media by using the hashtag #ghcreateathome